
Why You’ll Love This Recipe
- No baking required: Perfect for when you want a dessert without heating up the kitchen.
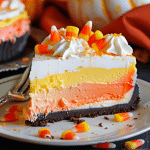
- Visually stunning: The candy corn-inspired layers make it ideal for holidays and parties.
- Make-ahead friendly: Chill it overnight for a stress-free treat the next day.
- Customizable: Adjust colors and toppings to fit other themes or preferences.
Ingredients
For the Crust:
- 2 cups crushed vanilla wafers (or graham cracker crumbs)
- ¼ cup granulated sugar
- ½ cup unsalted butter, melted
For the Cheesecake Filling:
- 24 oz cream cheese, softened
- 1 ¼ cups powdered sugar
- 2 tsp vanilla extract
- 2 ½ cups whipped topping (such as Cool Whip), thawed
- Yellow and orange gel food coloring
For the Topping:
- Whipped cream (optional)
- 1 cup candy corn
- Sprinkles (optional)
(Tip: You’ll find the full list of ingredients and measurements in the recipe card below.)
Directions
- Prepare the Crust:
Combine crushed vanilla wafers and sugar in a medium bowl. Stir in melted butter until the mixture is moist and crumbly. Press it firmly into the bottom of a 9-inch springform pan and chill in the refrigerator. - Make the Cheesecake Filling:
Beat softened cream cheese and powdered sugar in a large bowl until smooth. Add vanilla extract and mix well. Fold in whipped topping until the mixture is light and fluffy. - Divide and Color the Filling:
Separate the filling into three equal portions. Leave one plain (white layer), color one yellow with gel food coloring, and color the other orange. Stir until colors are evenly blended. - Layer the Cheesecake:
Spread the orange layer over the chilled crust, smoothing it out with a spatula. Gently add the yellow layer on top, followed by the white layer, ensuring the layers remain distinct. - Chill the Cheesecake:
Cover with plastic wrap and refrigerate for at least 6 hours, or preferably overnight, until fully set. - Garnish and Serve:
Before serving, top with whipped cream, candy corn, and sprinkles if desired. Slice and enjoy the creamy, festive layers!
Servings and Timing
- Servings: 10-12 slices
- Prep Time: 25 minutes
- Chill Time: 6 hours (or overnight)
Variations
- Crust options: Substitute graham cracker crumbs with Oreo cookie crumbs or ginger snaps for a unique flavor.
- Color themes: Swap orange and yellow for other colors to fit themes like Christmas, Easter, or a birthday party.
- Toppings: Replace candy corn with chocolate shavings, caramel drizzle, or fresh fruit for a different twist.
Storage/Reheating
- Refrigerator: Store the cheesecake covered in the fridge for up to 5 days.
- Freezer: Freeze slices individually for up to 2 months. Thaw in the refrigerator overnight before serving.
FAQs
1. Can I use homemade whipped cream instead of Cool Whip?
Yes, you can use homemade whipped cream. Beat heavy cream with powdered sugar until stiff peaks form and use it as a substitute.
2. What if I don’t have a springform pan?
You can use a regular pie dish, but it may be harder to remove the cheesecake without damaging the layers.
3. Can I make this cheesecake gluten-free?
Absolutely! Use gluten-free vanilla wafers or graham crackers for the crust.
4. How do I prevent the layers from mixing?
Be gentle when spreading each layer and refrigerate briefly between adding each one to help them firm up.
5. Can I use liquid food coloring?
Gel food coloring is recommended for vibrant colors without altering the texture.
6. Is this cheesecake suitable for kids?
Yes, it’s a kid-friendly dessert, especially with its fun candy corn look and sweet flavor.
7. Can I make mini versions of this cheesecake?
Definitely! Use cupcake liners in a muffin tin and layer the filling for individual servings.
8. How long should I chill the cheesecake?
For best results, chill for at least 6 hours, but overnight is ideal to ensure the layers are fully set.
9. Can I use other types of sugar for the crust?
Yes, brown sugar works well and adds a deeper flavor.
10. What’s the best way to slice this cheesecake neatly?
Use a warm knife, wiping it clean between slices, for perfect layers.
Conclusion
This No-Bake Candy Corn Cheesecake is a delightful and easy dessert that captures the essence of fall festivities. With its creamy texture, vibrant colors, and customizable options, it’s sure to impress at any gathering. Whether you’re hosting a Halloween party or simply indulging your sweet tooth, this cheesecake is a crowd-pleaser. Give it a try and enjoy the compliments!
Delicious No-Bake Candy Corn Cheesecake
- Total Time: 6 hours 25 minutes(Chill Time: 6 hours)
- Yield: 10-12 slices
- Diet: Vegetarian
Description
No-Bake Candy Corn Cheesecake is the ultimate Halloween dessert! With vibrant layers inspired by candy corn, this festive treat is creamy, colorful, and requires no baking. Perfect for fall gatherings, parties, or when you need a make-ahead dessert to impress.
Ingredients
For the Crust:
- 2 cups crushed vanilla wafers (or graham cracker crumbs)
- ¼ cup granulated sugar
- ½ cup unsalted butter, melted
For the Cheesecake Filling:
- 24 oz cream cheese, softened
- 1 ¼ cups powdered sugar
- 2 tsp vanilla extract
- 2 ½ cups whipped topping (e.g., Cool Whip), thawed
- Yellow and orange gel food coloring
For the Topping:
- Whipped cream (optional)
- 1 cup candy corn
- Sprinkles (optional)
Instructions
- Prepare the Crust:
- Combine crushed vanilla wafers and granulated sugar in a medium bowl.
- Stir in melted butter until the mixture is moist and crumbly.
- Press the mixture into the bottom of a 9-inch springform pan. Chill in the refrigerator.
- Make the Cheesecake Filling:
- Beat softened cream cheese and powdered sugar until smooth.
- Mix in vanilla extract, then gently fold in whipped topping until light and fluffy.
- Divide and Color the Filling:
- Divide the filling into three equal portions.
- Leave one portion plain (white layer).
- Use gel food coloring to dye one portion yellow and the other orange. Stir until evenly blended.
- Layer the Cheesecake:
- Spread the orange filling layer over the crust, smoothing it evenly.
- Gently add the yellow layer, followed by the white layer, ensuring distinct layers.
- Chill the Cheesecake:
- Cover with plastic wrap and refrigerate for at least 6 hours or overnight until set.
- Garnish and Serve:
- Top with whipped cream, candy corn, and sprinkles before serving. Slice and enjoy!
Notes
- Gel food coloring is preferred for vibrant colors without altering texture.
- For a neat slice, use a warm knife and wipe it clean between cuts.
- Chill briefly between layering to prevent colors from blending.
- Prep Time: 25 minutes
- Category: Dessert
- Method: No-Bake
- Cuisine: American
