
Why You’ll Love This Recipe
This dessert is a dream for chocolate and peanut butter lovers. It’s rich, decadent, and easy to whip up with minimal effort. Since there’s no baking involved, you don’t have to worry about heating up your kitchen, making it ideal for hot days or when you just want something simple. Plus, it’s no-bake, so you get to enjoy this indulgent treat in no time!
Ingredients
(Tip: You’ll find the full list of ingredients and measurements in the recipe card below.)
- Unsalted Butter
- Creamy Peanut Butter (smooth peanut butter works best)
- Graham Cracker Crumbs
- Powdered Sugar
- Chocolate Chips (semi-sweet or milk chocolate)
Directions
- Butter the bottom and sides of a 9×13-inch baking pan and set it aside.
- In a medium bowl, stir together melted butter, peanut butter, graham cracker crumbs, and powdered sugar until smooth and creamy.
- Press the peanut butter mixture into the prepared pan.
- In a microwave-safe bowl, combine chocolate chips and peanut butter. Heat for 30 seconds, stir, and continue heating in 10-second intervals until smooth.
- Spread the chocolate mixture evenly over the peanut butter layer.
- Chill the bars in the refrigerator for at least 2 hours, or until firm.
- Remove from the fridge and let them come to room temperature before cutting.
Servings and Timing
- Prep Time: 10 minutes
- Chill Time: 2 hours
- Total Time: 2 hours 10 minutes
- Servings: Makes about 12 bars, depending on the size you cut.
Storage/Reheating
Store leftover bars in an airtight container in the refrigerator for up to a week. If you’d like to freeze them, wrap the bars individually in plastic wrap and store them in a freezer-safe bag or container for up to six months. For best results, let them thaw in the fridge before serving, or enjoy them directly from the freezer for a cool treat.
FAQs
1. Can I use crunchy peanut butter instead of creamy?
Yes, crunchy peanut butter can be used, but it may alter the texture of the bars slightly.
2. Can I use a different type of nut butter?
You can substitute peanut butter with almond or cashew butter, but make sure it’s a smooth variety without any separated oil.
3. How long should I chill the bars before cutting them?
Allow the bars to chill for at least 2 hours in the refrigerator to ensure they firm up properly.
4. Can I make these bars ahead of time?
Absolutely! These bars can be made in advance and stored in the fridge for several days, making them perfect for prepping ahead of time for parties or gatherings.
5. Can I freeze these chocolate peanut butter bars?
Yes, you can freeze them for up to six months. Simply slice the bars and freeze them on a baking sheet before wrapping individually in plastic wrap.
6. What type of chocolate should I use for the topping?
Semi-sweet or milk chocolate chips work best, but you can use dark chocolate for a richer flavor if you prefer.
7. Can I use a different type of cookie crumb?
Yes, you can substitute graham cracker crumbs with vanilla wafer cookies or digestive biscuits for a different flavor base.
8. Do these bars need to be stored in the fridge?
Yes, to maintain their texture and freshness, it’s best to store the bars in the refrigerator.
9. How do I prevent the chocolate from melting when I cut the bars?
Let the bars come to room temperature for a few minutes before cutting to prevent the chocolate from cracking.
10. Can I add toppings to the bars?
Yes, you can add crushed peanuts, mini chocolate chips, or even a sprinkle of sea salt on top for extra flavor and texture.
Conclusion
These No-Bake Chocolate Peanut Butter Bars are an easy and delicious dessert that will satisfy your sweet tooth without the hassle of baking. With just a few ingredients and minimal prep time, you can have a decadent treat that everyone will love. Whether served chilled or at room temperature, these bars are perfect for any occasion.
Print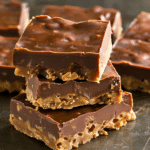
No Bake Chocolate Peanut Butter Bars
- Total Time: : About 12 bars, depending on size 2 hours 10 minutes
- Yield: : About 12 bars, depending on size
- Diet: Gluten Free
Description
These No-Bake Chocolate Peanut Butter Bars are a perfect treat for any chocolate and peanut butter lover. With just five simple ingredients and minimal prep time, these bars feature a creamy peanut butter filling topped with smooth chocolate. Quick, easy, and no baking required – they are perfect for satisfying your sweet tooth any time.
Ingredients
- 1/2 cup Unsalted Butter (melted)
- 1 cup Creamy Peanut Butter
- 1 1/2 cups Graham Cracker Crumbs
- 1 1/2 cups Powdered Sugar
- 1 1/2 cups Chocolate Chips (semi-sweet or milk chocolate)
Instructions
- Butter the bottom and sides of a 9×13-inch baking pan. Set aside.
- In a medium bowl, stir together melted butter, peanut butter, graham cracker crumbs, and powdered sugar until smooth and creamy.
- Press the peanut butter mixture into the prepared pan.
- In a microwave-safe bowl, combine chocolate chips and peanut butter. Heat for 30 seconds, stir, and continue heating in 10-second intervals until smooth.
- Spread the chocolate mixture evenly over the peanut butter layer.
- Chill the bars in the refrigerator for at least 2 hours, or until firm.
- Remove from the fridge and let them come to room temperature before cutting into bars.
Notes
- You can use crunchy peanut butter for added texture, but it may change the consistency slightly.
- For a different flavor base, substitute graham cracker crumbs with vanilla wafer cookies or digestive biscuits.
- Top the bars with crushed peanuts, mini chocolate chips, or a sprinkle of sea salt for extra flavor.
- Prep Time: 10 minutes
- Chill Time: 2 hours
- Category: Dessert, No-Bake
- Method: No-Bake
- Cuisine: American
