
Why You’ll Love This Recipe
- Perfect for the Holidays: These cookies are packed with warm, seasonal spices.
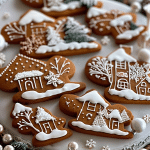
- Fun to Decorate: Great for kids and adults alike, decorating a winter village is a joyful activity.
- Customizable: Use different cookie cutters and decorations to create your own unique designs.
- Delicious and Aromatic: The rich combination of molasses and spices fills your kitchen with a heavenly aroma.
- Make-Ahead Friendly: The dough can be chilled ahead of time for convenience.
Ingredients
(Tip: You’ll find the full list of ingredients and measurements in the recipe card below.)
- 3 cups all-purpose flour
- 1 tsp baking soda
- 1 tbsp ground ginger
- 1 tbsp ground cinnamon
- 1/2 tsp ground cloves
- 1/2 tsp salt
- 3/4 cup unsalted butter, softened
- 1/2 cup brown sugar, packed
- 1 large egg
- 1/2 cup molasses
- 1 tsp vanilla extract
- Royal icing for decorating
- Assorted candies (candy canes, gumdrops, chocolate chips)
- Powdered sugar for snow effect
Directions
- Prepare the Oven: Preheat to 350°F (175°C) and line baking sheets with parchment paper.
- Mix Dry Ingredients: In a bowl, whisk together the flour, baking soda, ginger, cinnamon, cloves, and salt.
- Cream Butter and Sugar: In a separate bowl, beat butter and brown sugar until light and fluffy. Add the egg, molasses, and vanilla, mixing until smooth.
- Combine Mixtures: Gradually add the dry ingredients to the wet ingredients. Mix until fully incorporated. Chill the dough for at least 1 hour.
- Shape Cookies: Roll out the dough on a floured surface to 1/4 inch thickness. Use cookie cutters to create festive shapes.
- Bake: Arrange cookies on the baking sheet and bake for 8–10 minutes, or until golden brown. Let them cool completely before decorating.
- Decorate: Use royal icing to add intricate designs. Add candies and powdered sugar for a snowy effect.
- Assemble Your Village: Arrange cookies to create a winter village with houses, trees, and whimsical accents.
Servings and Timing
- Servings: Approximately 24 cookies, depending on the size of the shapes.
- Prep Time: 30 minutes
- Chill Time: 1 hour
- Cook Time: 10 minutes
Variations
- Gluten-Free: Substitute all-purpose flour with a gluten-free baking mix.
- Vegan Option: Use a vegan butter substitute and flaxseed meal mixed with water as an egg replacement.
- Spice Levels: Adjust spices to taste by adding more cinnamon or omitting cloves for a milder flavor.
- Decorations: Explore different candies, sprinkles, or edible glitter for a unique look.
- Shapes: Create stars, snowmen, or reindeer instead of traditional houses.
Storage/Reheating
- Storage: Store undecorated cookies in an airtight container at room temperature for up to 1 week.
- Decorated Cookies: Keep decorated cookies in a single layer in an airtight container to preserve designs.
- Freezing Dough: Wrap the dough tightly in plastic wrap and freeze for up to 3 months. Thaw in the fridge overnight before rolling and baking.
FAQs
How long does the dough need to chill?
The dough should chill for at least 1 hour to make it easier to roll out and prevent spreading during baking.
Can I use margarine instead of butter?
Yes, but the flavor and texture may differ slightly.
What is the best way to store royal icing?
Store royal icing in an airtight container in the fridge for up to 2 days. Stir before using.
Can I make the cookies ahead of time?
Absolutely! Bake the cookies and store them undecorated for up to a week. Decorate just before serving or gifting.
Are these cookies soft or crispy?
These gingerbread cookies are soft with slightly crisp edges. Adjust baking time for a softer or crispier texture.
What if I don’t have molasses?
You can substitute molasses with honey or dark corn syrup, though the flavor will differ.
Can I freeze decorated cookies?
While it’s possible, the decorations might become less vibrant. It’s best to freeze them undecorated.
Do I need to sift the powdered sugar for the snow effect?
Sifting powdered sugar ensures an even, fine “snow” layer on your cookies.
Can I use store-bought icing?
Yes, store-bought icing works, but homemade royal icing provides better detail for decorations.
How can I prevent the cookies from sticking to the cutters?
Dip the cookie cutters in flour before cutting to avoid sticking.
Conclusion
Gingerbread Cookies with Winter Village Decoration are not just a treat—they’re an experience. From baking to decorating, this recipe is perfect for creating cherished holiday memories. Whip up a batch, gather your loved ones, and let the magic of the season unfold one cookie at a time.
Gingerbread Cookies with Winter Village Decoration
- Total Time: 1 hour 40 minutes
- Yield: 24 cookies
- Diet: Vegetarian
Description
Create a holiday masterpiece with these delightful Gingerbread Cookies with Winter Village Decoration! Perfectly spiced and soft, these cookies are a festive treat and a creative canvas for crafting enchanting winter scenes. Fun to bake, decorate, and enjoy, they’re a holiday must-have.
Ingredients
- 3 cups all-purpose flour
- 1 tsp baking soda
- 1 tbsp ground ginger
- 1 tbsp ground cinnamon
- 1/2 tsp ground cloves
- 1/2 tsp salt
- 3/4 cup unsalted butter, softened
- 1/2 cup brown sugar, packed
- 1 large egg
- 1/2 cup molasses
- 1 tsp vanilla extract
- Royal icing for decorating
- Assorted candies (candy canes, gumdrops, chocolate chips)
- Powdered sugar (for snow effect)
Instructions
- Prepare the Oven: Preheat oven to 350°F (175°C). Line baking sheets with parchment paper.
- Mix Dry Ingredients: Whisk together flour, baking soda, ginger, cinnamon, cloves, and salt in a bowl.
- Cream Butter and Sugar: Beat butter and brown sugar in a separate bowl until light and fluffy. Add the egg, molasses, and vanilla, mixing until smooth.
- Combine Mixtures: Gradually add the dry ingredients to the wet ingredients, mixing until fully incorporated. Chill dough for at least 1 hour.
- Shape Cookies: Roll out dough on a floured surface to 1/4-inch thickness. Use cookie cutters to create desired shapes.
- Bake: Arrange cookies on baking sheets and bake for 8–10 minutes or until golden brown. Let cool completely before decorating.
- Decorate: Use royal icing to design intricate patterns. Add candies and powdered sugar for a snowy effect.
- Assemble Your Village: Arrange cookies to create a winter village, featuring houses, trees, and other festive designs.
Notes
- For easier rolling, divide dough into smaller portions before chilling.
- Adjust spices to suit your taste.
- Ensure cookies cool completely before decorating to avoid icing running.
- Prep Time: 30 minutes
- Chill Time:: 1 hour
- Cook Time: 10 minutes
- Category: Dessert
- Method: Baking
- Cuisine: Holiday/Seasonal
