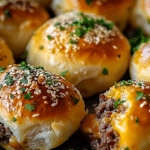
Why You’ll Love This Recipe
These Garlic Parmesan Cheeseburger Bombs are a great way to enjoy a juicy cheeseburger in a fun, bite-sized form. The combination of garlic, parmesan cheese, and cheddar enhances the flavor of the beef, while the biscuit dough provides a satisfying texture. They’re easy to make and perfect for sharing with family and friends.
Ingredients
- 1 lb ground beef
- 1 teaspoon salt
- 1 teaspoon pepper
- 2 teaspoons garlic powder
- 1 cup shredded cheddar cheese
- 1 can refrigerated biscuit dough (8 biscuits)
- 1/2 cup grated parmesan cheese
- 2 tablespoons melted butter
(Tip: You’ll find the full list of ingredients and measurements in the recipe card below.)
Directions
- Preheat your oven to 375°F (190°C).
- Cook the ground beef in a skillet over medium heat, seasoning with salt, pepper, and garlic powder. Brown the meat for 5-7 minutes, then drain excess grease and stir in half the cheddar cheese.
- Roll out each biscuit, flattening to about 4 inches wide. Place a spoonful of beef mixture and top with more shredded cheese. Fold the biscuit around the filling, sealing the edges.
- Arrange the bombs on a baking sheet, seam side down, and bake for 15-20 minutes until golden brown.
- Mix melted butter, garlic powder, and parmesan cheese. Brush over the baked bombs before serving.
Servings and Timing
- Servings: 8
- Preparation time: 20 minutes
- Cooking time: 20 minutes
- Total time: 40 minutes
Variations
- Swap cheddar cheese for mozzarella or pepper jack cheese for a different taste.
- Use homemade biscuit dough instead of refrigerated for a more personalized touch.
Storage/Reheating
Store any leftovers in an airtight container in the refrigerator for up to 3 days. To reheat, place them in a preheated oven at 375°F for 5-7 minutes to restore their crispness.
FAQs
How do I prevent the biscuit dough from being too tough?
Make sure to handle the dough gently, and avoid overworking it. Knead it only until combined.
Can I freeze these Garlic Parmesan Cheeseburger Bombs?
Yes! After assembling them, you can freeze the uncooked bombs on a baking sheet and transfer them to an airtight container. Bake from frozen, adding a few extra minutes to the cooking time.
What’s the best way to serve these?
These bombs can be served as appetizers, a snack, or as a main dish alongside a salad or dipping sauces like ranch or ketchup.
Can I use lean ground beef?
While you can use lean beef, 80/20 ground beef is recommended for juicier bombs. Lean beef might dry out during baking.
How do I make the garlic flavor stronger?
Increase the amount of garlic powder in the beef mixture or add minced garlic to the melted butter for a more intense garlic flavor.
What other cheeses can I use in this recipe?
Mozzarella, pepper jack, or a blend of your favorite cheeses would work well in these bombs.
Can I use homemade biscuit dough?
Yes, homemade biscuit dough can be used instead of the refrigerated dough for a fresher taste.
What should I do if my bombs open up during baking?
Ensure that the edges of the biscuit dough are tightly sealed to prevent them from opening during baking.
Can I make these bombs ahead of time?
Yes, you can prepare the bombs and refrigerate them until ready to bake, or freeze them for later.
Can I use ground turkey instead of beef?
Ground turkey is a good alternative for a lighter version, though the flavor may be less rich than ground beef.
Conclusion
Garlic Parmesan Cheeseburger Bombs are a fun and flavorful twist on traditional cheeseburgers. With a savory filling and crispy, golden dough, these bombs are a hit at any gathering. Whether you’re serving them for game day, a family dinner, or as an appetizer, they’re sure to impress. Try them today for a delicious treat your guests will love!
Print
Garlic Parmesan Cheeseburger Bombs Recipe
- Total Time: 40 minutes
- Yield: 8 servings
Description
Garlic Parmesan Cheeseburger Bombs are the perfect party food or appetizer, offering a delicious twist on traditional cheeseburgers. Juicy ground beef, gooey cheese, and a burst of garlic flavor wrapped in soft biscuit dough create the ultimate savory snack. Easy to make and irresistibly tasty, these bite-sized bombs are ideal for family meals, game days, or gatherings. A combination of cheddar, parmesan, and garlic gives these cheeseburger bombs a rich, bold flavor that will leave everyone asking for more.
Ingredients
- 1 lb ground beef
- 1 teaspoon salt
- 1 teaspoon pepper
- 2 teaspoons garlic powder
- 1 cup shredded cheddar cheese
- 1 can refrigerated biscuit dough (8 biscuits)
- 1/2 cup grated parmesan cheese
- 2 tablespoons melted butter
Instructions
- Preheat your oven to 375°F (190°C).
- In a skillet, cook ground beef over medium heat, seasoning with salt, pepper, and garlic powder. Brown the meat for 5-7 minutes, then drain excess grease and stir in half the cheddar cheese.
- Roll out each biscuit to about 4 inches wide. Place a spoonful of the beef mixture on each biscuit and top with more shredded cheese. Fold the biscuit dough around the filling, sealing the edges tightly.
- Arrange the stuffed biscuits on a baking sheet, seam side down, and bake for 15-20 minutes or until golden brown.
- In a small bowl, mix the melted butter, garlic powder, and parmesan cheese. Brush this garlic butter mixture over the baked bombs before serving.
Notes
- Substitute cheddar cheese with mozzarella, pepper jack, or a cheese blend for a unique twist.
- Use homemade biscuit dough if you prefer a fresher touch instead of refrigerated dough.
- Prep Time: 20 minutes
- Cook Time: 20 minutes
- Category: Appetizer, Snack, Dinner
- Method: Baking, Skillet
- Cuisine: American

